
Free Amigurumi Pattern
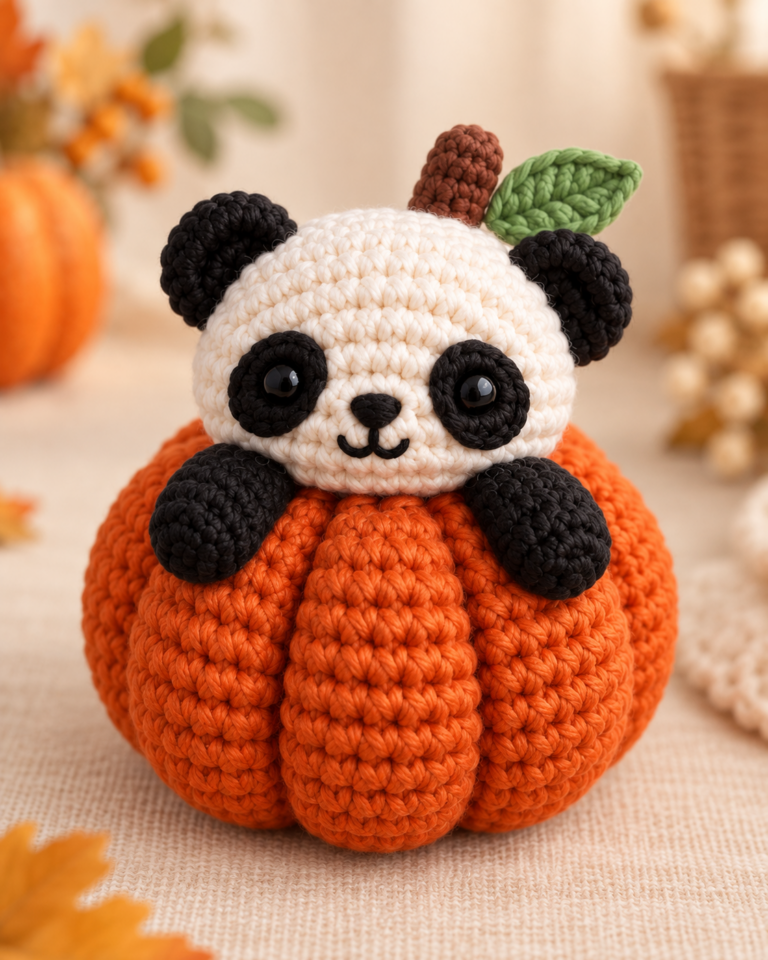
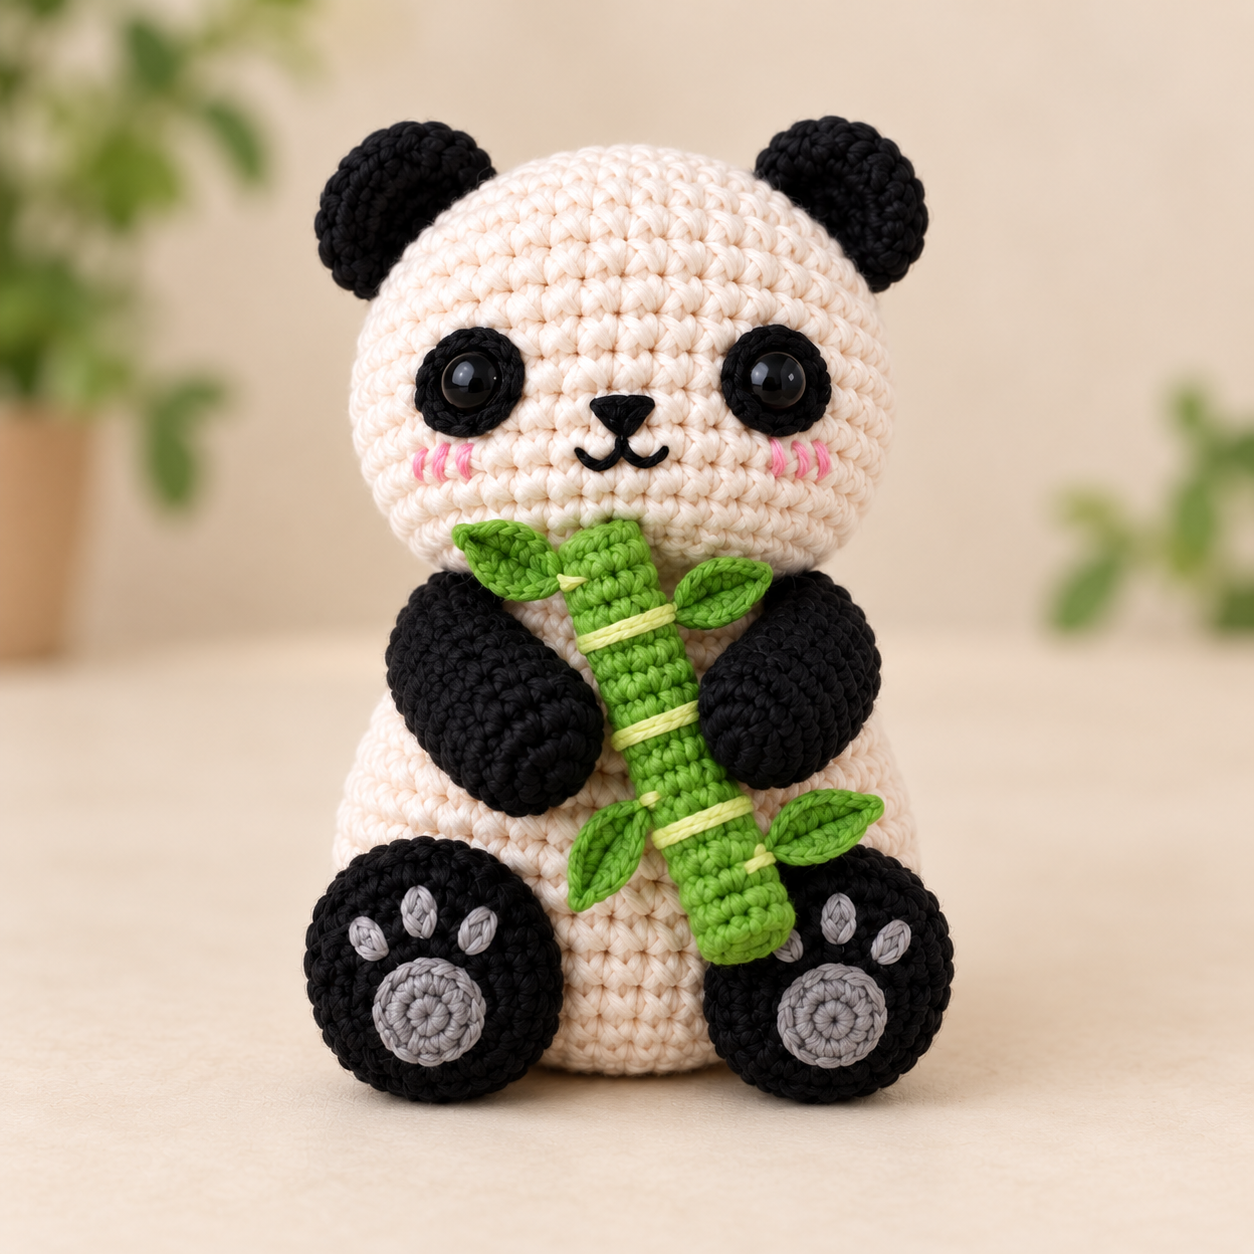
A little bamboo stalk, soft pink cheeks, and tiny gray paw pads give this crochet panda its character. The separate head, body, and limbs let you adjust the sitting pose before sewing everything together.
This panda crochet pattern with bamboo takes you through nine sections, from gathering your supplies to attaching the last leaf. Seven photo collages show the main construction stages, with a materials photo at the beginning and a finished panda at the end.
Keep the written instructions beside you as you work. Each four-panel photo reads from top left to top right, then bottom left to bottom right.
Panda Crochet Pattern with Bamboo: Overview
The estimated seated height is about 14–17 cm (5.5–6.7 in) when worked in DK cotton with a 2.5 mm hook, but this is a virtual estimate rather than a measured sample. Actual size and yarn quantities depend on your yarn, hook, tension, and stuffing. Use the same yarn weight for all crocheted pieces. Changing to chenille will make the panda larger and change the proportions.
Step 1: Gather Your Materials
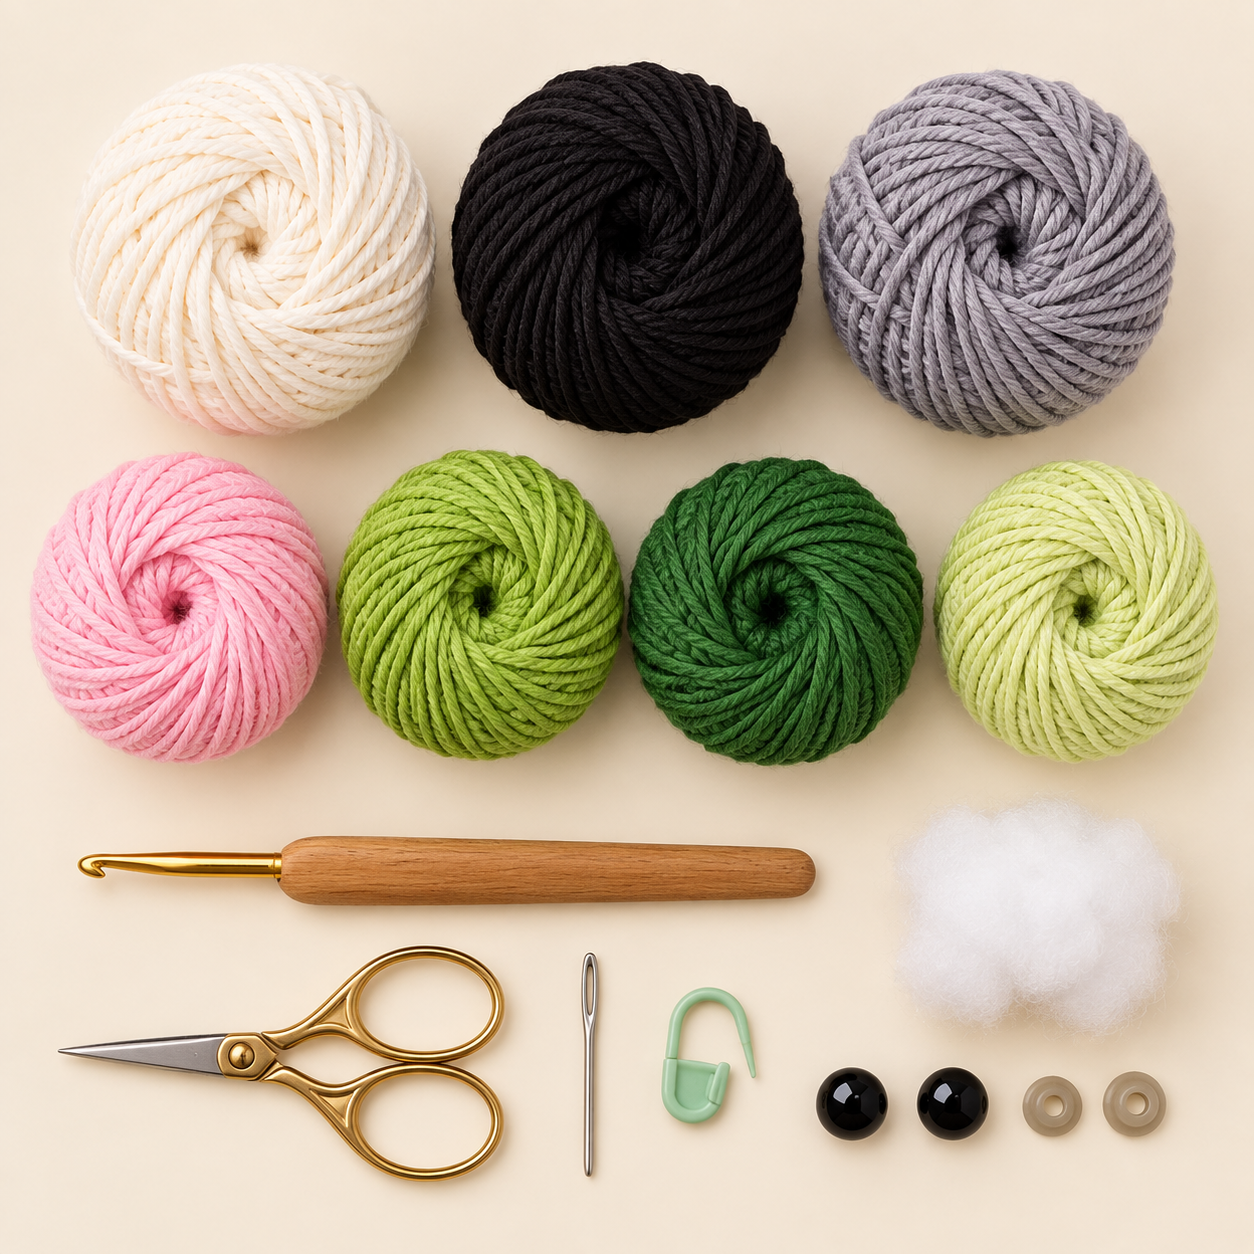
- DK cotton yarn in cream, black, gray, pink, apple green, darker green, and pale yellow-green.
- A 2.5 mm crochet hook as a starting point; adjust if stuffing shows through the stitches.
- Polyester toy stuffing, a stitch marker, scissors, sewing pins, and a blunt yarn needle.
- A pair of safety eyes with matching washers; 10–12 mm is a provisional range to check against your actual head and patches before fastening.
- Black embroidery yarn for the nose and mouth, and pink yarn for the cheeks.
For a version without plastic eyes, embroider the eyes securely instead. Select all materials and attachments for the intended recipient.
Abbreviations
| Term | Meaning |
|---|---|
| MR | Magic ring |
| ch | Chain |
| sc | Single crochet |
| inc | Work 2 sc into the same stitch |
| dec | Invisible single crochet decrease over the next 2 stitches |
| sl st | Slip stitch |
| hdc / dc | Half double crochet / double crochet |
| R / sts | Round / stitches |
Work in continuous spiral rounds unless directed otherwise. Mark the first stitch of every round. Instructions in parentheses are repeated the stated number of times; the final number is the total stitch count. For an invisible decrease, insert the hook through the front loops of the next two stitches, yarn over and pull through both front loops, then yarn over and pull through the remaining two loops.
For standard crochet terminology, see the Craft Yarn Council crochet abbreviation guide.
Step 2: Crochet the Head
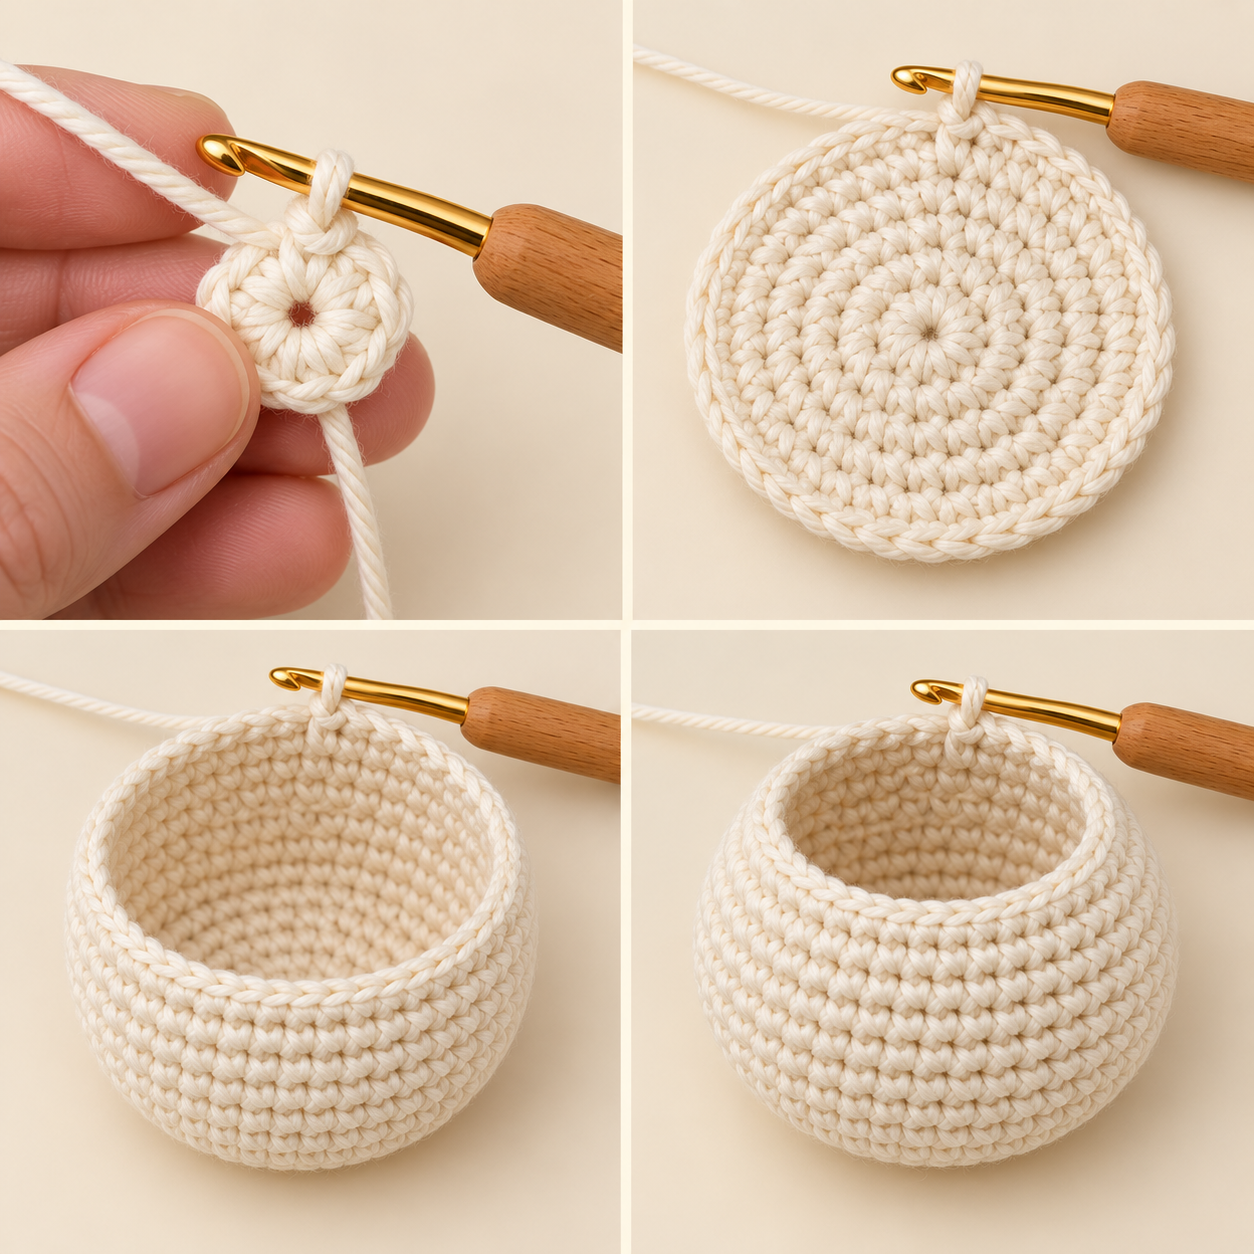
Use cream yarn. Begin at the crown and work toward the neck.
| Round | Instructions | Sts |
|---|---|---|
| 1 | 6 sc in MR | 6 |
| 2 | inc × 6 | 12 |
| 3 | (sc, inc) × 6 | 18 |
| 4 | (2 sc, inc) × 6 | 24 |
| 5 | (3 sc, inc) × 6 | 30 |
| 6 | (4 sc, inc) × 6 | 36 |
| 7 | (5 sc, inc) × 6 | 42 |
| 8 | (6 sc, inc) × 6 | 48 |
| 9 | (7 sc, inc) × 6 | 54 |
| 10 | (8 sc, inc) × 6 | 60 |
| 11–18 | sc in every stitch for 8 rounds | 60 each |
| 19 | (8 sc, dec) × 6 | 54 |
| 20 | (7 sc, dec) × 6 | 48 |
| 21 | (6 sc, dec) × 6 | 42 |
Pause here without fastening off. Secure the working loop with a marker. Do not stuff yet: you need access to the inside to attach the eyes and finish the embroidery.
Step 3: Add the Eye Patches and Face
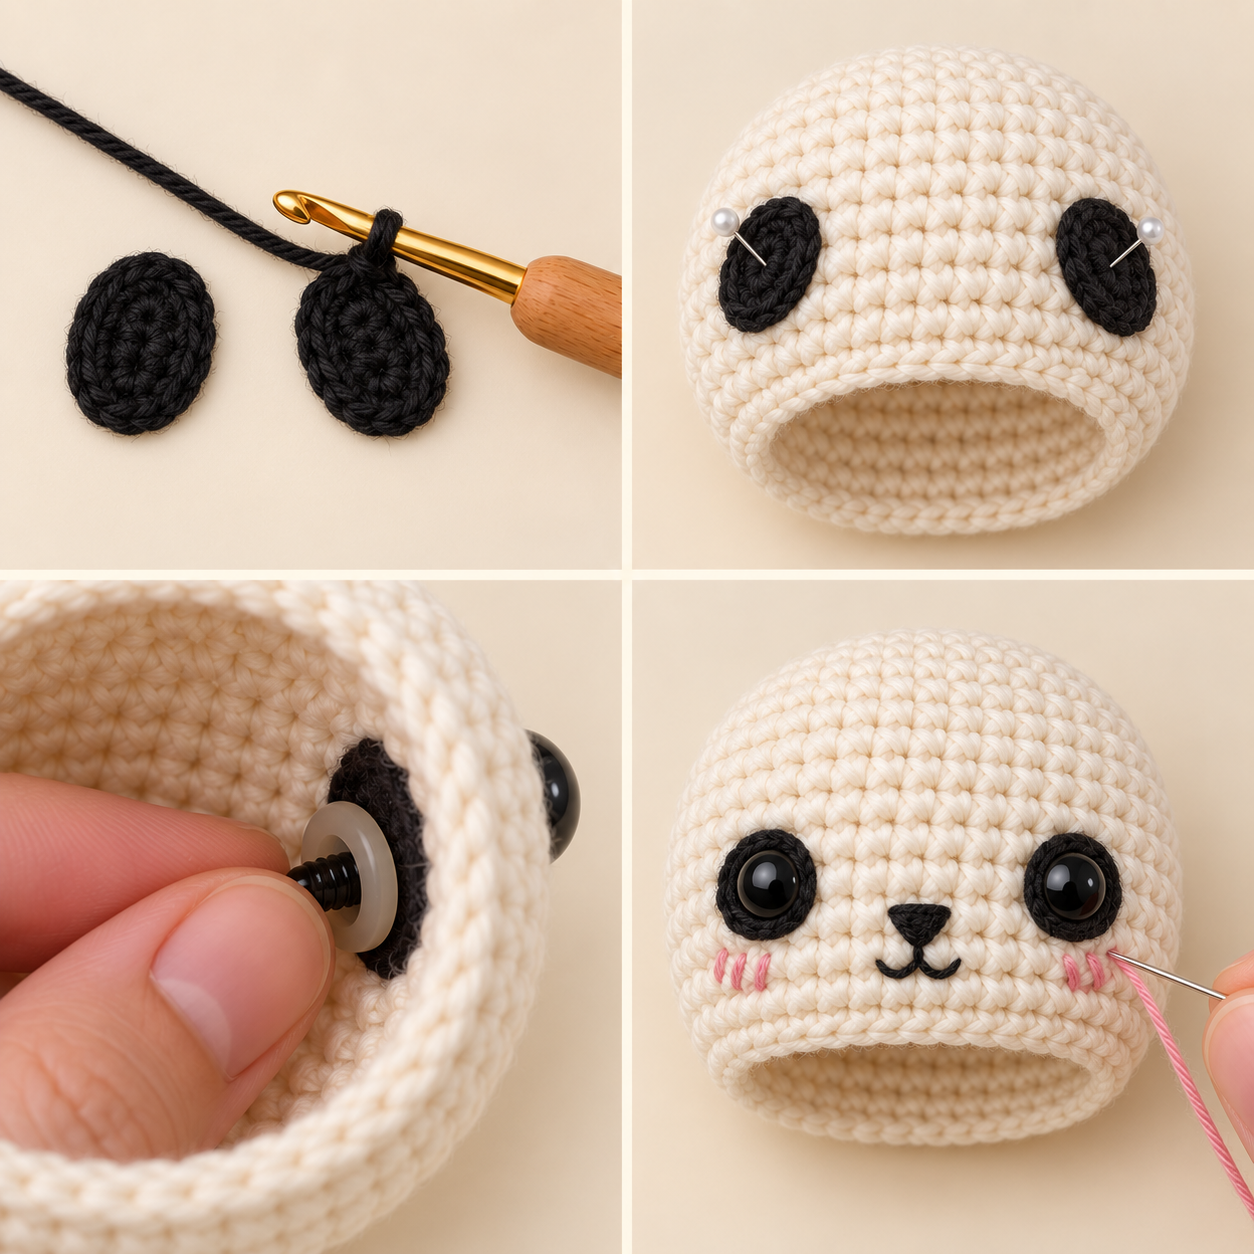
Eye Patches — Make 2 in Black
Chain 5. Work around both sides of the chain to make an oval.
- R1: Starting in the second chain from the hook, sc in the next 3 chains, 3 sc in the last chain. Continue along the underside: sc in the next 2 chains, 2 sc in the last chain. 10 sts.
- R2: inc in the next stitch, sc in the next 2 stitches, inc in each of the next 3 stitches, sc in the next 2 stitches, then inc in each of the last 2 stitches. 16 sts.
Slip stitch to finish, leaving a 30 cm sewing tail. Make the second patch the same way.
Position and Attach the Eyes
Pin the patches on the front of the head with their upper ends tilted slightly inward. As a starting placement, position the eye stems between head rounds 14 and 15, roughly 10 stitch positions apart along the round. Check symmetry on your actual piece before fitting any washers; these positions are provisional.
Pass each eye stem through a gap in its patch and then through the head fabric. Fit the matching washer inside the cream head, so both layers are held between the eye and washer. Sew the patch edges to the head with small stitches. The black patches belong on the outside of the head.
Embroider the Nose, Mouth, and Cheeks
Center a small black triangular nose around rounds 16–17, approximately three stitches wide. Add a short vertical line below it and two small curved stitches for the mouth. Secure the yarn inside. Add three or four short pink stitches to the cream fabric below the outer side of each eye patch. Keep the cheeks clear of the black patches.
Step 4: Stuff the Head and Add the Ears
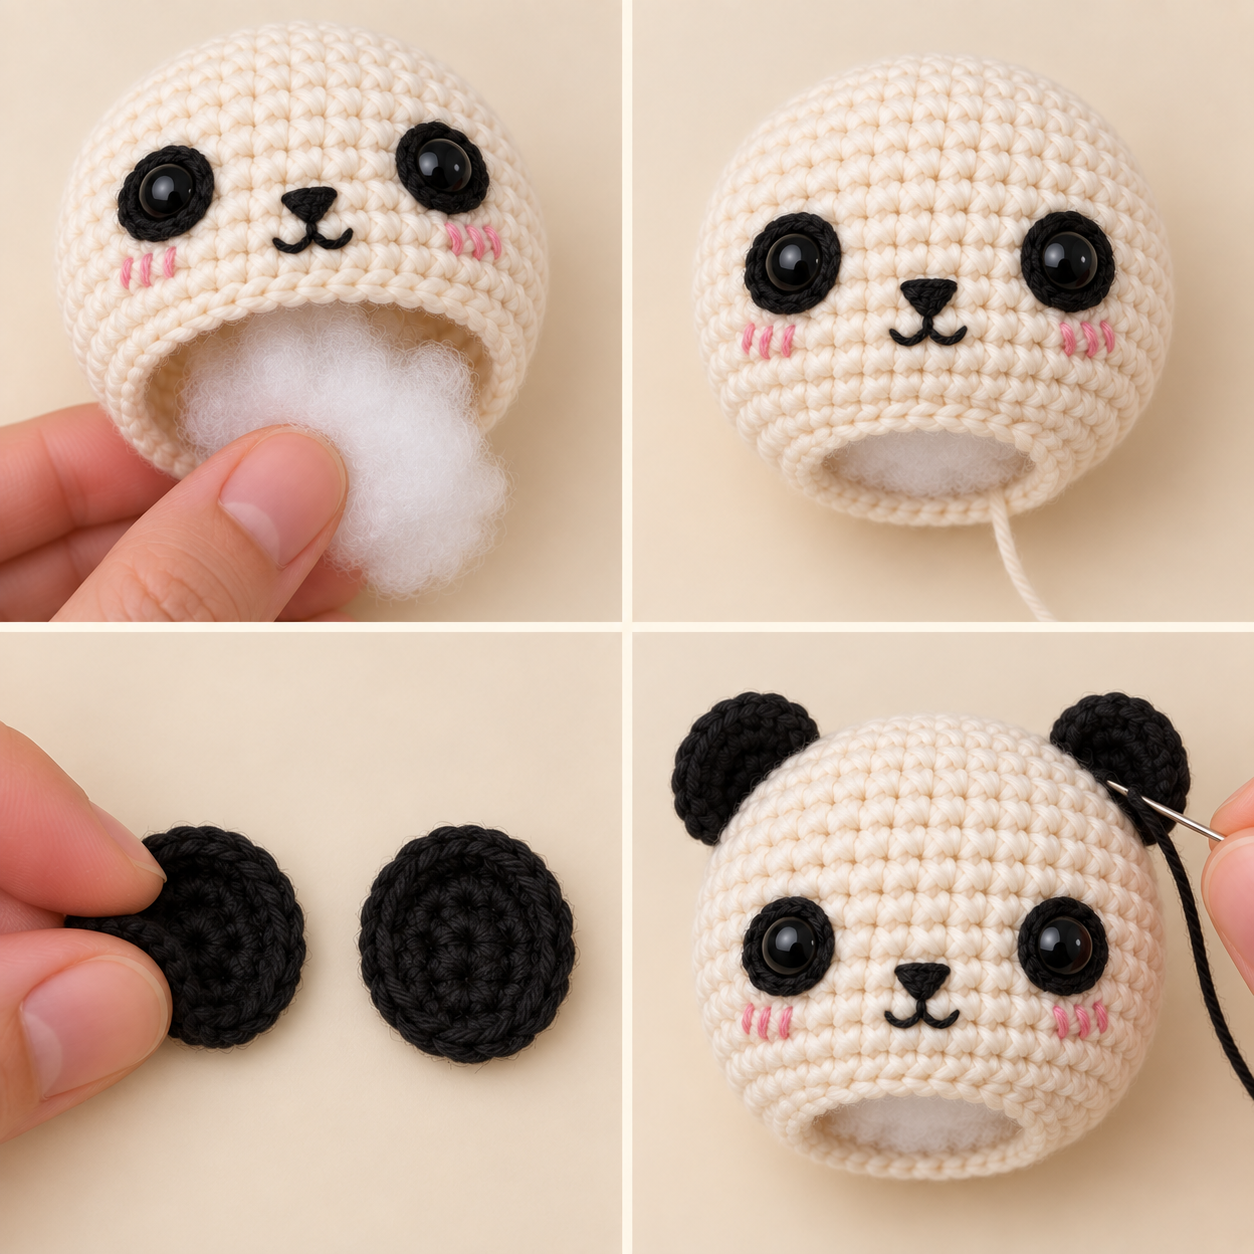
Add stuffing in small portions, distributing it around the cheeks and crown. Resume the cream working loop:
| Round | Instructions | Sts |
|---|---|---|
| 22 | (5 sc, dec) × 6 | 36 |
| 23 | (4 sc, dec) × 6 | 30 |
| 24 | (3 sc, dec) × 6 | 24 |
Top up the stuffing without stretching the fabric. Fasten off with a 45 cm sewing tail. Leave the 24-stitch neck opening open. It will be sewn to the matching body opening.
Ears — Make 2 in Black
- R1: 6 sc in MR. (6)
- R2: inc × 6. (12)
- R3: (sc, inc) × 6. (18)
- R4–5: sc around. (18 each)
Leave a sewing tail. Do not stuff. Flatten each cup so the 18 rim stitches form 9 opposing pairs, and sew the rim closed through the pairs. Pin the flattened bases symmetrically near head rounds 5–9. Check their height from the front and sew securely.
Step 5: Crochet the Body
Use cream yarn. Work from the bottom upward to form a rounded base and narrower neck.
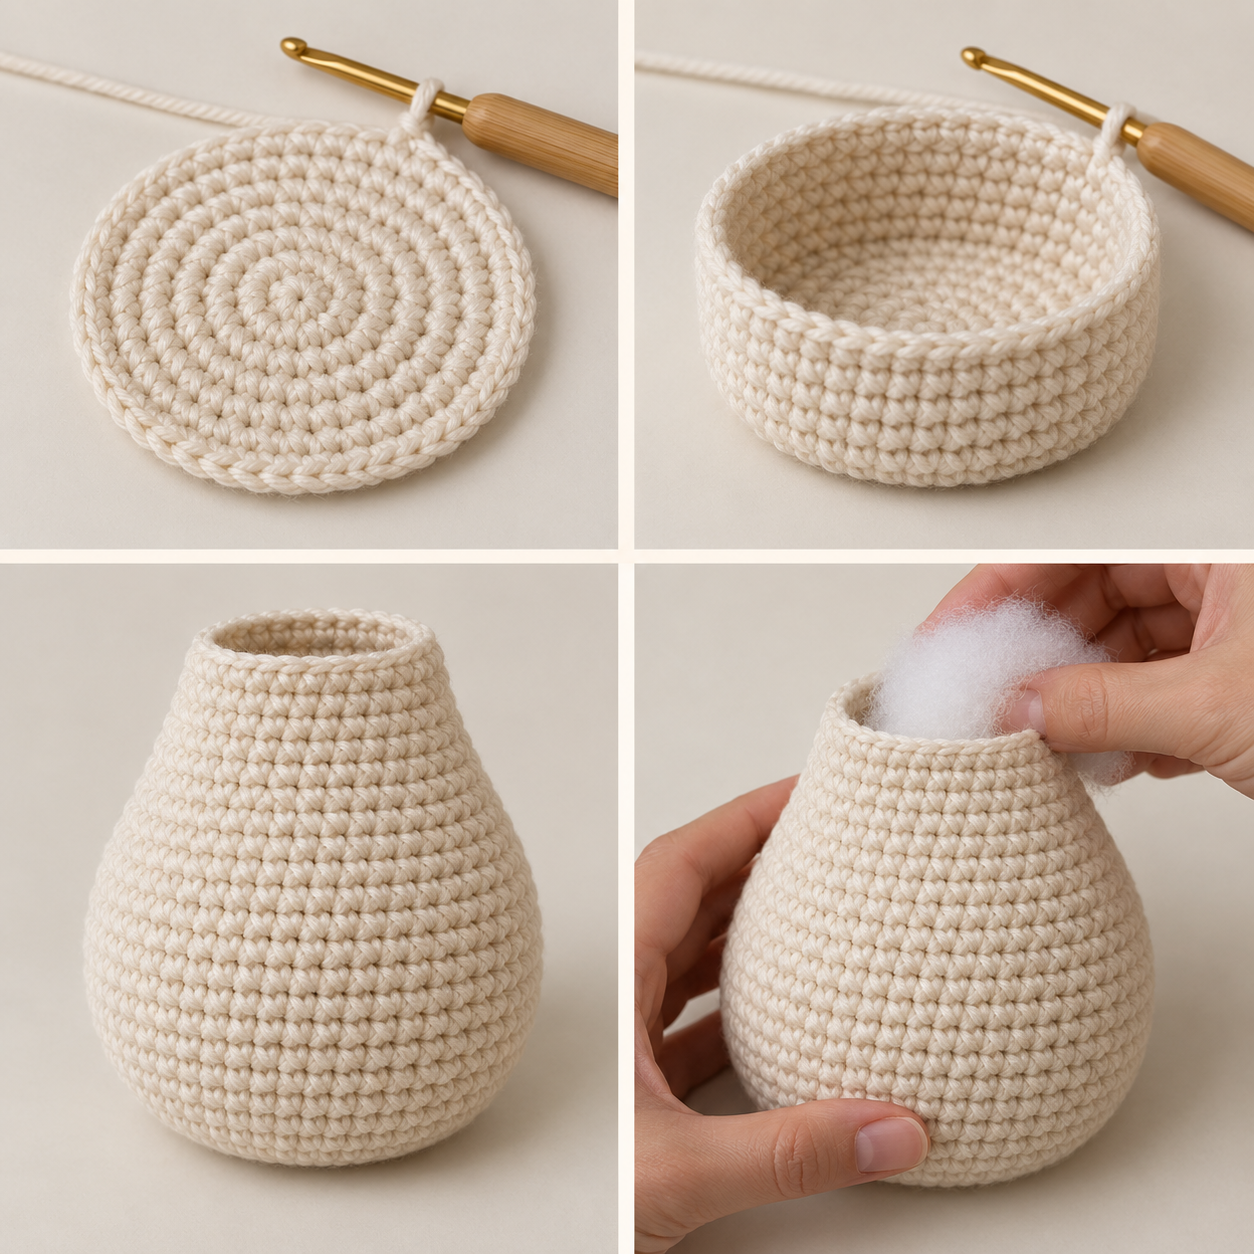
| Round | Instructions | Sts |
|---|---|---|
| 1 | 6 sc in MR | 6 |
| 2 | inc × 6 | 12 |
| 3 | (sc, inc) × 6 | 18 |
| 4 | (2 sc, inc) × 6 | 24 |
| 5 | (3 sc, inc) × 6 | 30 |
| 6 | (4 sc, inc) × 6 | 36 |
| 7 | (5 sc, inc) × 6 | 42 |
| 8–12 | sc around for 5 rounds | 42 each |
| 13 | (5 sc, dec) × 6 | 36 |
| 14–16 | sc around for 3 rounds | 36 each |
| 17 | (4 sc, dec) × 6 | 30 |
| 18–19 | sc around for 2 rounds | 30 each |
| 20 | (3 sc, dec) × 6 | 24 |
| 21 | sc around | 24 |
Fasten off and secure the end. Stuff the body evenly, keeping the base rounded but stable. Leave the 24-stitch neck opening open.
Step 6: Make the Arms, Feet, and Paw Details
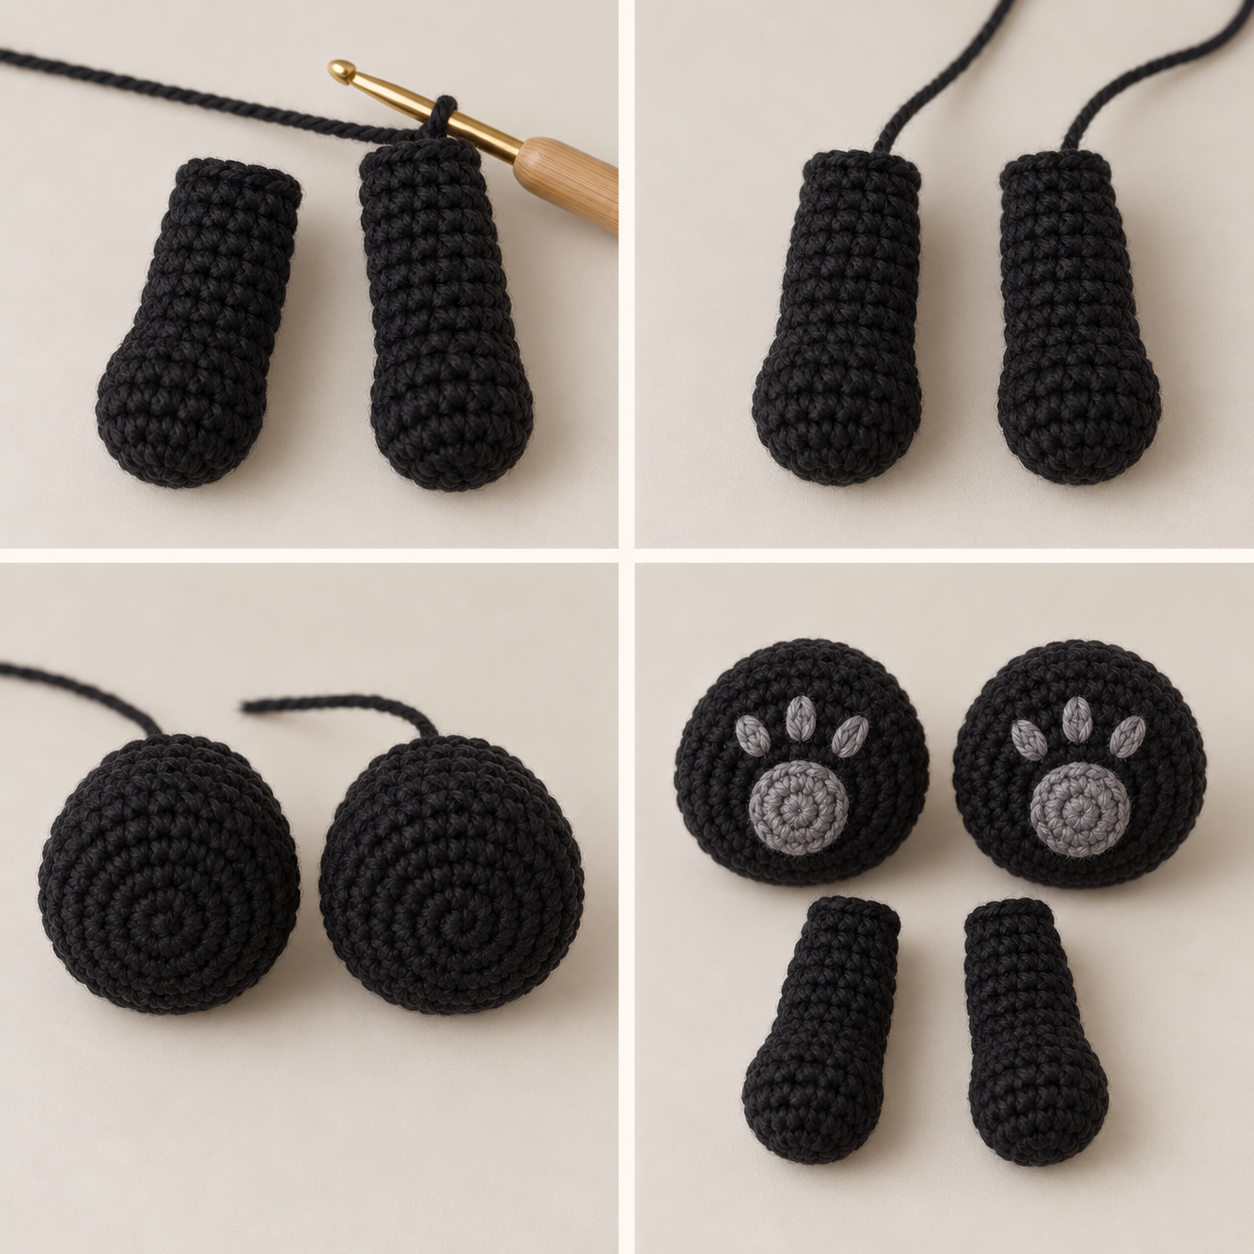
Arms — Make 2 in Black
| Round | Instructions | Sts |
|---|---|---|
| 1 | 6 sc in MR | 6 |
| 2 | inc × 6 | 12 |
| 3 | (sc, inc) × 6 | 18 |
| 4–5 | sc around | 18 each |
| 6 | (4 sc, dec) × 3 | 15 |
| 7 | sc around | 15 |
| 8 | (3 sc, dec) × 3 | 12 |
| 9–10 | sc around | 12 each |
Lightly stuff the rounded hand end, leaving the last two rounds unstuffed. Flatten the opening and work 6 sc through both layers to close it. Leave a 35 cm sewing tail.
Feet — Make 2 in Black
| Round | Instructions | Sts |
|---|---|---|
| 1 | 6 sc in MR | 6 |
| 2 | inc × 6 | 12 |
| 3 | (sc, inc) × 6 | 18 |
| 4 | (2 sc, inc) × 6 | 24 |
| 5–7 | sc around | 24 each |
| 8 | (2 sc, dec) × 6 | 18 |
| 9 | (sc, dec) × 6 | 12 |
| 10 | dec × 6 | 6 |
Add stuffing before round 10. Thread the yarn through the front loops of the remaining six stitches and draw closed. Leave a 40 cm tail for attachment. The starting magic-ring side is the front sole; the closed end faces the body.
Gray Paw Pads — Make 2
R1: 6 sc in MR. R2: inc × 6. (12 sts.) Slip stitch and leave a sewing tail. Sew one pad slightly below the center of each front sole. Above each pad, embroider three small oval toes, using two or three short parallel stitches per toe. Secure all ends.
Step 7: Assemble the Panda
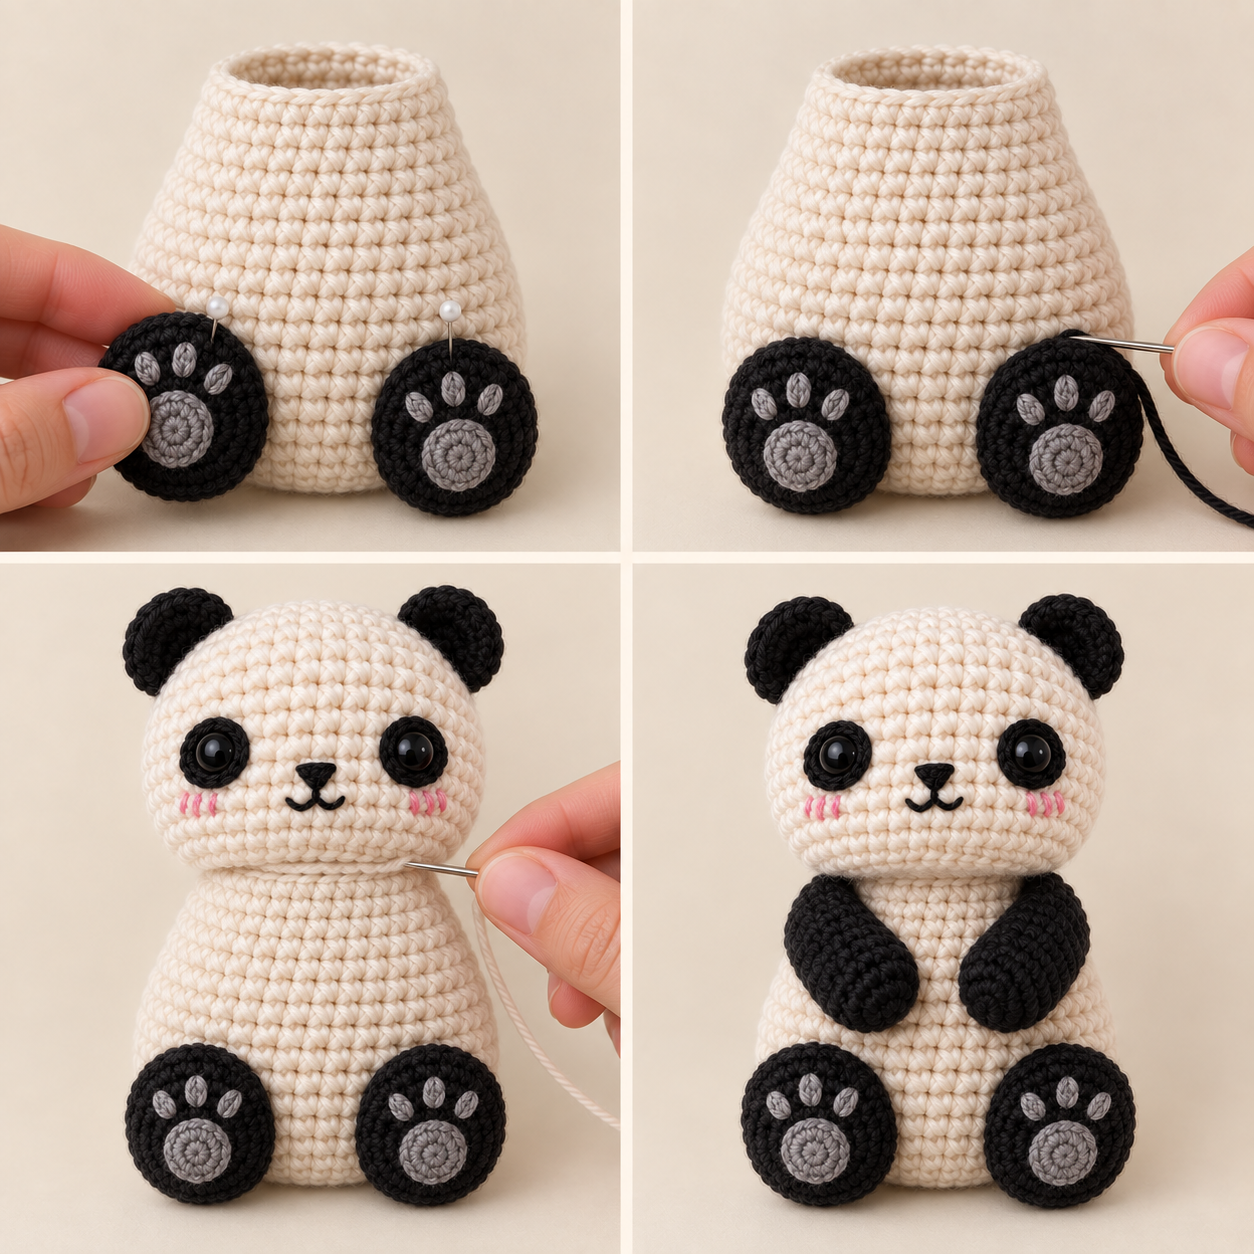
- Position the feet. Pin them to the lower front body, approximately across rounds 4–9, with both gray soles facing forward. Sit the body on a flat surface and adjust until it balances.
- Sew the feet. Stitch the rear of each foot to the body over several adjacent stitches. Keep the decorative soles visible and secure the tails inside.
- Join the head. Align the face with the center between the feet. Match the 24 head-opening stitches to the 24 body-opening stitches. Use the cream head tail to sew around the neck, adding a little stuffing at the join before the final stitches if needed. Because the head is intentionally larger than the body, keep this seam firm; after the first full pass, add four small hidden reinforcing stitches at the front, back, and both sides if the head feels loose.
- Attach the arms. Pin their flattened tops near body rounds 17–20. Angle the rounded ends toward the center of the belly. Sew the top edges securely, leaving the hands free for the bamboo.
Check the panda from the front and side before securing each seam. Round placements are starting guides; adjust the pins to suit your actual crocheted pieces.
Step 8: Crochet and Attach the Bamboo
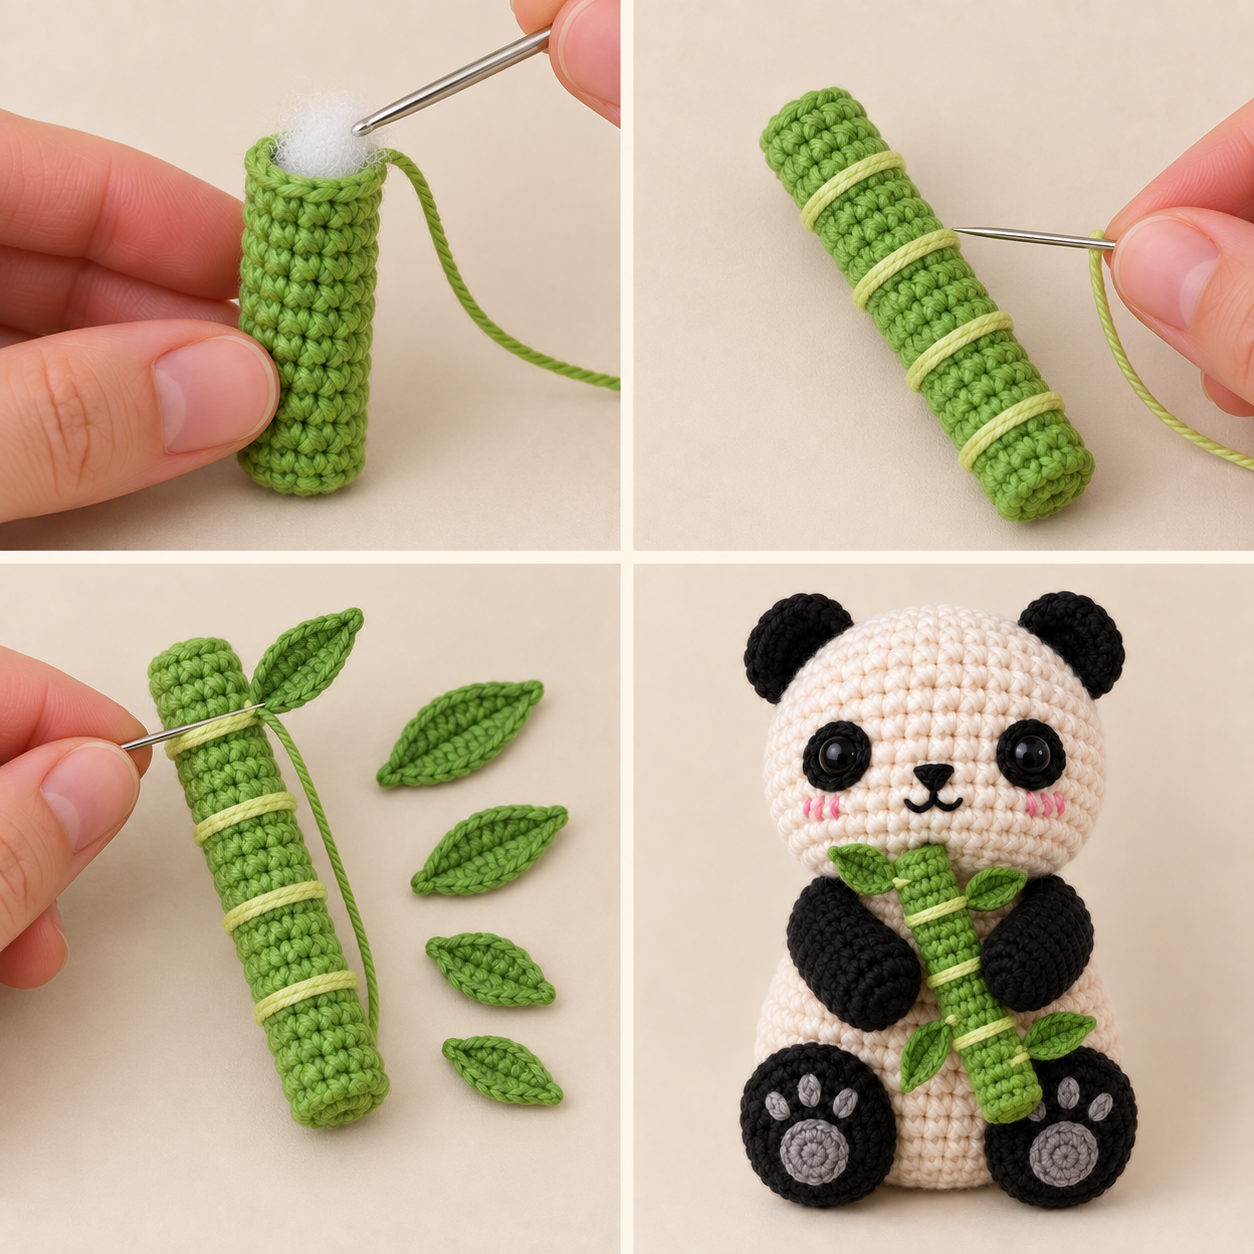
Bamboo Stalk — Apple Green
- R1: 6 sc in MR. (6)
- R2: (sc, inc) × 3. (9)
- R3–23: sc around. (9 each)
- R24: (sc, dec) × 3. (6)
Insert small amounts of stuffing every four or five rounds while the opening is accessible. Before the final decrease, hold the stalk against the assembled panda: it should reach from just below the mouth toward the lower belly. Add or remove plain 9-stitch rounds if needed, and record the adjustment. Draw the final six stitches closed and secure the end.
With pale yellow-green yarn, embroider four narrow rings around the stalk, initially between rounds 4–5, 9–10, 14–15, and 19–20. Anchor each ring with small stitches so it stays in place. Space them evenly if you changed the stalk length.
Leaves — Make 4 in Green
These leaves are worked around both sides of a foundation chain to create a fuller almond shape that better matches the photo tutorial.
- Two larger leaves: ch 8. Starting in the second chain from the hook, work sl st, sc, hdc, dc, hdc, sc, 3 sc in the last chain. Continue along the opposite side of the foundation chain: sc, hdc, dc, hdc, sc, sl st. Fasten off.
- Two smaller leaves: ch 6. Starting in the second chain from the hook, work sl st, sc, hdc, sc, 3 sc in the last chain. Continue along the opposite side of the foundation chain: sc, hdc, sc, sl st. Fasten off.
Leave a 20 cm tail on each leaf. Sew the narrow base of each leaf to the stalk, alternating their directions around the bamboo. Spread the leaves so the panda's face remains visible.
Attach the Bamboo
Place the stalk diagonally between the hands, with its upper end below the mouth and lower end pointing toward the viewer’s right. Use green yarn to make small hidden stitches between the stalk and each hand. Add a discreet stitch to the body if the stalk still rotates. Secure and bury the tails.
Step 9: Finish and Shape Your Panda
Remove all pins, bury the remaining yarn ends, and gently redistribute the stuffing with your fingers. Check that the ears sit evenly, both feet face forward, and the bamboo stays in place without pulling the arms away from the body.
Sit the panda on a flat surface and adjust the feet and lower body gently. Spread the leaves so they frame the bamboo without covering the embroidered mouth.
If Something Looks Uneven
- The eyes look uneven: compare the pinned positions before securing washers. Count from the same head round on both sides.
- The head tilts: check that the neck openings were aligned evenly and that the stuffing supports the join.
- The panda tips backward: reposition the feet while they are still pinned and check the distribution of stuffing.
- The bamboo turns: add a small hidden attachment stitch at the second hand or body.
Keep notes on your yarn, hook, eye placement, and any adjusted rounds. The stitch counts and construction flow have been virtually checked, but your real measurements will still be valuable for a future physical sample and for refining the estimated finished size and yarn usage.